Diff: HomeCarbonator
Differences between version 2 and predecessor to the previous major change of HomeCarbonator.
Other diffs: Previous Revision, Previous Author
| Newer page: | version 2 | Last edited on September 5, 2016 10:19 am | by PhilHollenback | Revert |
| Older page: | version 1 | Last edited on August 1, 2016 11:20 pm | by PhilHollenback | Revert |
version 2
The Quest
Ah, seltzer water. The finest drink in the finest of restaurants. Refreshment of kings. There are just two problems with selter water, if you are as frugal as I am.
- It's expensive for what you get
- It's wasteful, what with all those bottles or cans
There must be a better way to do things, right? I knew about the [[https://www.sodastream, so that seemed a reasonable thing to check out. Well. the Sodastream does the job for sure, ure, but it has problems:
- proprietary co2 bottles that you can't refill
- proprietary bottles that are expensive
In parallel, I investigated old fashioned 'seltzer bottles'. I even purchased this bottle from Isi. The idea here is that you fill the canister with water and inject co2 via a small cartridge that you screw on.
The Isi worked fine once I figured it out. The cost was reasonable, if you purchased large boxes of third party chargers - around 30 cents per quart. It was less wasteful than buying bottles of soda water at the store, but probably more wasteful than the sodastream since you have to use a charger cartridge for every quart of water. Plus, the whole process of filling the canister with water, finding the chargers, installing a charger, etc. was (although fun in an old timey way) ultimately annoying. Surely I could do better, right? Back to the interent for more research.
DIY Options
I first wondered if you could use some sort of adapter to connect regular co2 canisters to a Sodastream. Well, it turns out you can use an adapter to replace the proprietary Sodastream canisters with standard refillable paintball co2 tanks. That seemed promising, however other limitations of the Sodastream remained, for example you still had to use the proprietary Sodastream bottles to make your seltzer water. Also, I would still have to spend all the money to buy a Sodastream unit, and find a nearby sporting goods store to recharge the co2 canisters.
I had just about given up on the idea of improving on my seltzer bottle setup when I happened to find this Serious Eats blog post. Here at at last were clear instructions on how to construct your own home carbonation rig that promised cheap and convenient seltzer water.
Converging on a Solution
But wait, there was a problem: this setup still used tiny 24 ounce paintball canisters. I wanted something bigger so I didn't have to swap canisters often. Then, I thought about my childhood. I grew up in my parent's restaurant, and I remembered very well the work of swapping out soda syrup and co2 cannisters for the soda dispenser. There must be some way to do something like that at home, right? The answer is yes! With just a few parts and some simple assembly, you can have a system that creates a virtually unlimited supply of seltzer water for pennies a gallon. Plus, you can use standard two liter soda bottles so you don't even have to waste bottles! Hold on, here come the details.
Parts List
Here are the parts you need to purchase to create your own in-home seltzer dispenser, except for the actual co2 canister. I'll tell you where and how to purchase that later in this article.
Regulator
The regulator connects to the co2 canister and converts the very high (900psi) pressure of the canister to a level that plastic bottles can handle (40-60psi). I purchased the Kegco Two Dial Regulator for around $45.
It turns out this regulator is kind of junky as I will explain later. If I were doing this again I would purchase a different regulator.
Tubing and Quick Disconnect
The regulator connects directly to the co2 canister, and provides co2 at a suitable low pressure. You then need to get that gas from the regulator in to a bottle. In this case, I went with this gas line assembly and ball lock for $10.
Two Liter Adapter
The quick disconnect fitting doesn't connect directly to a plastic soda bottle, so you need an adapter. There are a couple different ones to choose from on Amazon, the main difference beint whether the connector is made of plastic or metal. I chose the metal one based on the reviews. It cost around $15.
Bottle Time
So. for around $70 you can set up everything you need for a home carbonation system, except for the co2 bottle. Not bad, right? Assembling all these parts is fairly straightforward, and I will provide instructions for all of that later in this article.
However, I still needed a co2 cylinder. Luckily, some quick googling solved this problem. It turns out that I live just a mile from a welding supply store. Welding supply stores supply various gasses, including co2. I headed to the store to figure out all the details.
Welding supply stores sell gas cylinders on a swap system. You bring them an empty canister and they give you a full one in return. Now, one fun thing about this home system I was setting up was that it could be used with any 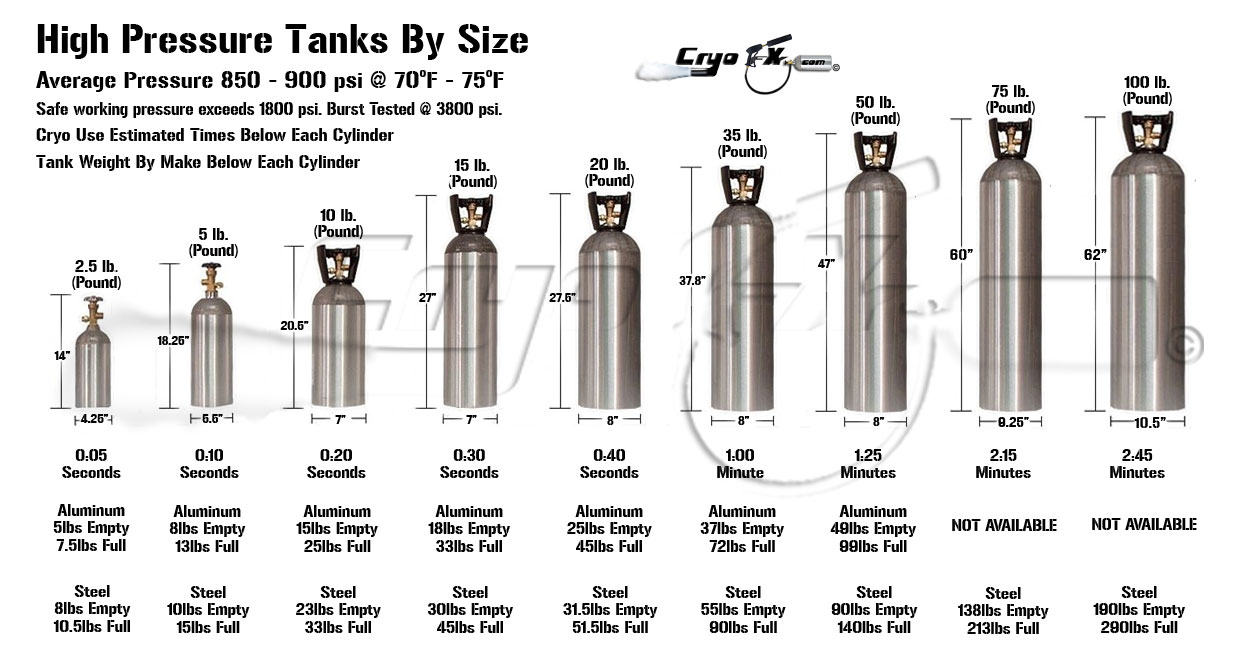 ]. If I wanted, I could buy a big 50 pound tank and basically have carbonated water forever. However, my needs were more modest so I chose a five pound cylinder. This size of cylinder is easy to transport (just under two feet long) while still holding much more gas than a little paint gun canister.
A note on "food safety". Apparently it is possible to purchase co2 cylinders that are not "food-safe". From what I've been able to gather, that means the cylinder could have tiny amounts of lubrication or other contaminants in it. However, I asked at the the welding store and was told that all their co2 cylinders are food safe. The one I bought came with a label that said as much so there you go.
Assembly
Here's how you assemble this whole thing. Don't worry, it's not terribly difficult.
Cylinder to Regulator
connect cylinder to regulator, screw tight
Regulator to Quick Disconnect
tubing, cable clamps, etc
Soda Bottle Adaptor
quick disconnect to adapter
Operation
Initial Calibration of Regulator
Filling a Bottle
connect soda bottle
turn valves
shake etc
include my movie
Pricing
The pricing at the welding supply store was as follows: $80 for the initial tank, $35 for the fillup of co2, and $35 for each subsequent tank swap. So the initial purchase price was ($80 + $35), or $115. That brought my total startup cost to $185. Obviously this is more expensive than a Sodastream, but I'm pretty confident that over time I save money. It's definitely cheaper than a seltzer bottle or buying soda water from the store. Estimates on the web say you can carbonate perhaps 100 liters of water with a five pound co2 bottle. That works out to under four cents a quart! Even better, it just keeps getting cheaper since every time you replace the cylinder it's just $35 for the swap.
Conclusion
Home carbonation is the way to go! With a small initial investment, you can have a setup that produces excellent seltzer for very little money. The assembly and setup are not complicated, and operation is fairly simple. I highly recommend this configuration for anyone who enjoys the bubbly taste of of seltzer water and also enjoys keeping money in their pocket.

