Diff: MakeupBattlestation
Differences between version 4 and previous revision of MakeupBattlestation.
Other diffs: Previous Major Revision, Previous Author
| Newer page: | version 4 | Last edited on February 21, 2016 10:39 pm | by PhilHollenback | Revert |
| Older page: | version 3 | Last edited on January 14, 2016 1:12 pm | by PhilHollenback | Revert |
version 4
Introduction
I've been meaning to design and build a makeup battlestation for Liz for a while. For those of you unfamiliar with the term, a battlestation is what makeup junkies call the area where they apply their makeup.
Liz prefers to do her makeup standing up at a wall mirror, so I figured I would start with that. I just had a basic door hang mirror with a wooden frame (like this one). Thus I decided to build everything around that mirror. The following describes the parts I used and how I assembled it. Anyone with basic construction skills can easily do the same.
Design Requirements
- Full length standing mirror
- Bright, white direct lighting
- Fan for ventilation
- Clock
Parts
- 12v power supply
- LED strip lighting - neutral white (4000k)
- Two LED strip light housing
- LED strip light connectors
- LED dimmer
- hookup wire
- butt connectors
- Kitchen clock
- One oversize washer
- 1/2 inch double sided mounting tape
- Adjustable usb fan
- on/off switch
Tools
- Crimper / wire stripper
- Light duty stapler
- Drill
- Drill bits
Construction
First, hang the mirror on the door. In my case, I found that the mirror was a bit too low when mounted because Liz is very tall. To fix that, I unscrewed the hang arms from the back of the mirror and moved them down. That was easy because the mirror had a wood frame.
Next, attach the LED strip light housings to the mirror, one on each side. Make sure they are high enough on the mirror to shine directly on the user's face. The goal here is concentrated direct light shining straight on the face to eliminate shadows. You have a couple choices for mounting the housings - you can use the foam mounting tape or screws. I chose to use screws, which meant I had to drill a couple holes thorugh each housing. That was easy to do as they are aluminum.
The LED light tape come in a continuous strip with adhesive on the back of the strip. If you examine the tape you will see small 'cut here' markings every few inches. Use these to cut two length of lights slightly shorter than each housing.
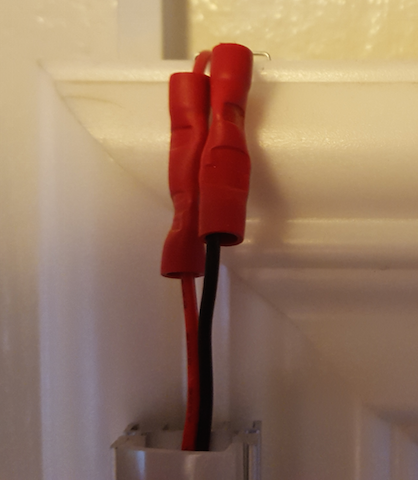
Attach strip light connectors to one end of each led tape, being careful to line up the + on the tape with the red wire on the connector. Note that these connectors can be difficult to use - you have to push the tape under the metal prongs with quite a bit of force. The connectors are meant to bridge one tape to another. Since you are just connecting one tape to your wiring, you can cut off one end of each connector. Then, you use the butt crimp connectors to join the connectors to regular wire, like so:
Now you can remove the backing from the led tapes and stick both of them inside the housings (remove the plastic housing covers first). You probably want to bring the connectors out the top, since that's where the other electrical components like the fan and switches will be.
Use double sided tape to mount the dimmer switch near the top of the mirror. If you want to put it somewhere else, that's fine - you will just need to run more wire.
Attach the fan above the mirror, pointing downward. I chose this fan because a) it takes usb power and b) it has an adjustable base so you can aim it up and down. I attached it by drilling two holes through the plastic base and screwing the fan to the door. Double sided tape probably won't work because the fan is heavy and does not have a flat base.
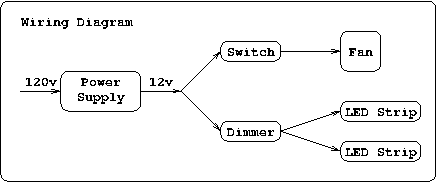
Wiring Diagram
Here's the completed wiring diagram. Don't worry, it's simpler than it looks.
Summary
Go build your lady a battlestation and have fun! This project does take a bit of work, but the results are very impressive. The lights are very bright and also nicely diffused by the plastic housing covers. Liz reports that it's an excellent place to apply makeup.

