Diff: PowerbookUpgrade
Differences between version 2 and previous revision of PowerbookUpgrade.
Other diffs: Previous Major Revision, Previous Author
| Newer page: | version 2 | Last edited on October 18, 2007 6:44 pm | by PhilHollenback | Revert |
| Older page: | version 1 | Last edited on February 24, 2012 11:54 am | by PhilHollenback | Revert |
version 2
Aging PowerBook Upgrade by a Linux/OS X Geek
by Philip Hollenback
originally published on MacDevCenter.com on 06/07/2006.
Editor's note: Many Mac users railed against chromatic's recent article, Switching Back to Desktop Linux. When Philip Hollenback, a Linux fan himself, needed to upgrade his aging PB 667 from Panther to Tiger, he used an approach that kept costs down and value high, while preserving his Linux/OS X frame of mind. Here's how he did it.
I've been using a PowerBook as my primary system for about two years, and I've found the experience very enjoyable. As a longtime Linux user, I'm continually impressed with the power and ease of use of Mac OS X. I get the best of both worlds: my familiar Linux command-line tools and a beautiful GUI environment.
However, the previous version of Mac OS 10.3 (Panther) was showing its age on my laptop. It had been clear for several months that it was time to upgrade my system. There were many interesting features in Mac OS 10.4 (Tiger), such as Spotlight and Automator, that I wanted to try out. Plus, the writing was on the wall: clearly Apple would stop providing anything but critical updates for 10.3 at some point in the near future.
Thus I decided to take the plunge and upgrade my PowerBook (an older 667DVI model) to Tiger. However, there were two problems:
- Over the past several years, I have experimented with lots of different applications on my machine. As a result, it was cluttered with extra files and settings. Basically everything was a mess - I had no idea what I actually used and what was just extra cruft. Plus, I had only a vague idea how I had arrived at my current selection of system preferences and other configuration selections.
- My existing hard drive was 30GB, and I had only about 2GB free (thanks to my large music collection). Thus any upgrade would likely run out of room.
Given these issues, I decided a clean install was my best bet. I needed more disk space, leaving all the garbage behind. After a little research I had a solution: I would do a fresh install of Tiger on an external drive, and then swap that drive with the existing hard drive in my PowerBook. This would allow me to selectively copy data from my old drive to the new drive. When I was done, my old drive could serve as a external backup.
Hardware Selection
The first order of business was to find a way to connect an external hard drive to my laptop. Since my PowerBook is an older model, the only effective way to do this was with Firewire (IEEE 1394). I could use a USB drive, but this Mac only supports USB1.1, which would result in very low data-transfer speeds (12Mbit/s vs. 400Mbit/s for Firewire).
A little more web searching turned up a number of hard drive enclosures from various vendors. For maximum flexibility, I decided to purchase one that supported both USB2.0 and Firewire, in case I wanted to use it with a newer system later. Since both the new and old drives were 2.5-inch drives, I needed a 2.5-inch enclosure. I selected the model USHDEC-2.5 from USModular. Any similar enclosure would most likely work fine. One benefit of these 2.5-inch enclosures is that they are all bus-powered, i.e., they take power from the host computer instead of requiring a separate power supply. The cost for this enclosure (including shipping) was just $42.
With my enclosure selected, I then needed a new hard drive. My Powerbook contained a 30GB drive, so doubling that to 60GB seemed a reasonable upgrade. I selected a Hitachi Travelstar 60GB drive for $100; again, any drive from one of the big hard drive manufacturers would probably work fine. The only issue you might run into is a drive that is too tall. Any modern drive should be short enough (under 12.5mm), but some older drives may be taller.
Hardware Installation
I now had all the hardware I needed, so it was time to get out the screwdrivers. My plan was as follows:
- Install the new drive in the external enclosure and connect it to the system.
- Do a fresh install of Tiger (Mac OS 10.4) on the new drive.
- Customize that install and copy files from the old drive (still inside the Powerbook) as necessary.
- Once satisfied that the new drive was ready to go, install it in the Powerbook and put the old drive in the enclosure (swap drives between enclosure and laptop).
I'll skip numbers one and two because they aren't terribly difficult. Warning: before continuing, think carefully about whether you actually want to open up your PowerBook and replace the hard drive. One way that Apple makes PowerBooks look so darn cool is by cramming everything into the smallest space possible. This means that when you take apart a Powerbook, it's very easy to do things such as accidentally disconnecting unrelated wires and breaking tiny connectors. I've disassembled lots of laptops over the years, and I find PowerBooks to be the most demanding of careful attention.
Also, of course, since this is a PowerBook, you need a #8 Torx driver to open the case. A tip: if you find yourself wanting to remove a Torx screw that is smaller than a #8, it probably means you are trying to remove the wrong screw. Apple uses #8 Torx screws for the ones you need to remove, such as the case cover, and #6 Torx screws for things you probably shouldn't remove, such as display hinges.
OS Installation and Disk Swap
The actual OS X 10.4 install isn't terribly interesting because it's so easy. One thing you should do is select the option to install Apple's X11 at the same time. You can always do this later, but if you are going to be installing anything that requires X11 (for example, The Gimp or OpenOffice), then you might as well install it now. Also, I selected the new drive as the target during the install process - the whole point of doing the install this way is to leave the existing hard drive untouched. The installer will detect the old drive and offer to import your user data to the new system. Don't do this: you want a clean install! Instead, following my plan for a clean install, I manually copied files later (as detailed below).
Once I had Tiger installed on the new drive, I had a laptop that could boot either the old OS (OSX 10.3.9) from the internal drive or the new OS (OSX 10.4) from the external drive. This is a good time to swap the drives between the laptop and the enclosure. Technically, you could run the system indefinitely off the external drive. However, this would be a bit awkward in practice. Firewire cables don't have a locking connection, and I found it quite easy to accidentally disconnect the drive when I moved my laptop. This would result in a complete system lockup if the system was running off the external drive.
Other than that problem, the external drive functioned well. I could choose to boot from either drive through the Startup Disk System Preference as needed.
At this point I had the new drive installed in the system and the old drive in the external enclosure, so my hardware work was complete. However, although I could boot a virgin copy of Tiger on the new drive, all my software and customizations were still on the old disk. Now it was time to start customizing the new OS install on the new disk.
Configuration Files
One of my primary goals with this upgrade was to wipe my PowerBook clean. In the time I'd owned the machine, I'd installed and later abandoned many programs. My system was littered with forgotten configuration files and unused applications.
Thus I resolved to freshly install only those programs that I actually used. This meant that I couldn't use the import user from old system functionality in the Tiger installer because it would copy those old files to my new drive. I needed a clean break. On the plus side, I could connect my old drive to the system at any time (remember, it was now in the enclosure) if I needed to copy old files - this wasn't a one-way upgrade.
I created a new user on the new system with the same shortname (that's what Mac OS calls the login name) as my user on the old drive. I wasn't too concerned about the UIDs (user ids - the numeric id that Unix uses to keep track of users) matching up because I wasn't going to be networking this system with NFS or anything similar. This user was an administrative user with full rights, so I could use sudo to change any settings as root.
Once I had my new user set up, I began copying files from the old system. Remember, I was interested in mainly documents and user files, not configuration files. Thus I copied the following files and directories (all from my home directory):
Documents/*
Pictures/*
Music/*
.muttrc
.bashrc
.bash_profile
.emacs
.vimrc
.ssh/*
.mailcap
.urlview
This list is my old documents and pictures, plus my basic Unix configuration files.
I also copied several files to ensure that my new install of Firefox would work in a similar fashion to my old one:
Bookmarks:
/Library/Application Support/Firefox/Profiles/<profile>/bookmarks.html
Passwords:
/Library/Application Support/Firefox/Profiles/<profile>/signons.txt/Library/Application Support/Firefox/Profiles/<profile>/key3.txt
That gave me the majority of files and settings that I cared about, and none of the extra cruft.
Software Installation
With my basic user information in place it was now time to install applications. One very convenient feature of the Mac OS is that most software is installed by dragging a file into /Applications. Thus you can quickly see what is installed on a Mac by looking in that folder.
I took this opportunity to also ensure that I was up to date by going to each application website and downloading the latest version. This was simplified by the fact that I'm a big open source fan and thus I didn't have to track down too many licenses. The following is a partial list of the packages I installed (the full list with more notes is available on my website).
- Aquamacs 0.9.8: Aquamacs is hands-down the best Emacs currently available for Mac OS X. It's a native Cocoa app so it works like other Mac apps. Also, it combines both the emacs keybindings with the Mac keybindings in a surprisingly pleasing manner. The result is that you never feel like you have to switch between the emacs world and the Mac world. I wrote this article in Aquamacs. Free and open source (GPL license).
- Firefox 1.5: OK, I know that Safari is prettier and it scrolls a heck of a lot faster. However, I spend my days on Linux for my job, so it's nice to have the same web browser on both systems. Plus, you can customize Firefox with useful add-ons for things such as ad blocking. Safari suffers from a lack of a good plugin architecture. Free and open source (MPL license).
- OpenOffice.org 2.0: Finally, there is a decent office suite for the Mac. While it's unfortunate that there isn't a native UI version yet (except for the separate NeoOffice project), OpenOffice is more than adequate for basic word processing and spreadsheet work. I confess, this is installed on my system more for guests to use than for my own use. Free and open source (MPL license).
- The Gimp 2.2.10: The Gimp is the only free image-editing software that even remotely competes with Photoshop. I use it when the basic touch-up tools in iPhoto aren't sufficient.This version of the Gimp comes prepackaged as a Mac executable; however, you do have to have X11 already installed. Free and open source (GPL license).
- MPlayer 1.0pre8: MPlayer for the Mac OS is a very capable movie player, plus it doesn't nag you to death the way the standard Mac Quicktime player does. The Mac version plays pretty much everything except some of the latest Windows Media Player movies. Free and open source (GPL license).
- Desktop Manager: Those of you coming from Linux or Unix know how absolutely useful multiple virtual desktops can be. You can group your applications together on different desktops and then quickly switch between them with a hotkey. Desktop Manager implements this for the Mac OS, and it does it in a way that won't cause problems with Mac software that doesn't expect users to switch desktops.Desktop Manager appears to be somewhat abandoned, but it does still work on Mac OS 10.4. However, the system logs a number of nasty messages about degraded performance when Desktop Manager starts up. Hopefully development on it will pick up at some point. Free and open source (GPL license).
Fink and DarwinPorts
While Mac OS X comes with enough basic Unix tools to get you started, it lacks a lot of tools that Linux users are familiar with. Also, many of the installed Unix programs are very basic versions (for example, the Emacs shipping with Mac OS is text-only).
There are two projects that try to address this: Fink and DarwinPorts. Both provide a way to automatically download and install prepackaged open source software. I was using Fink only until recently, when I noticed that some software is starting to appear in DarwinPorts and not Fink. It seems DarwinPorts might be more active these days.
Here is a list of the Fink packages I currently have installed:
anacron        2.3-4          Periodic command scheduler
aspell         0.50.5-1       Spell checker better than ispell
bzip2          1.0.2-12       Block-sorting file compressor
cdrecord       1.11a39-1      A command line CD/DVD writing tool
eject          1.0-1          Eject removable media
grep           2.4.2-3        Search text files for patterns
imagemagick    5.5.1-23       Image manipulation tools
lynx           2.8.4-24       Console based web browser
mkisofs        1.11a39-1      Creates ISO-9660 CD-ROM filesystem images
mpg123         pre0.59s-8     Real time MPEG Audio Player for Layer 1,2
ncftp          3.1.7-1        Browser program using ftp protocol
netpbm         9.25-13        Graphics manipulation programs and libraries
nmap           3.75-2         Network exploration utility
openssh        3.9p1-2        Secure shell (remote login) client and serve
pstree         2.17-1         Shows the ps listing as a tree
sed            4.0.5-1        The stream editor, GNU version
tidy           20021210-2     Utility to tidy up HTML code
transfig       3.2.4-6        Converts xfig objects to various graphics
unzip          5.52-11        Decompression compatible with pkunzip
urlview        0.9-11         Extracts URLs from text
wget           1.8.2-2        Automatic web site retriever
xfig           3.2.4-4        Menu-driven tool to create graphical objects
I also have gqview, slocate, and offlineimap installed from DarwinPorts.
As you can see, this augments the Unix environment on the Mac with a few useful tools. If you are a Linux user, you need either DarwinPorts or Fink (or both) and the software they provide.
System Preferences
When I use a particular computer environment, I don't feel I've truly mastered it until I understand every configuration option (and thus I will probably never really master Emacs). After I had installed my fresh copy of Tiger on my Powerbook, I went through every system preference panel and noted all the changes I made from the default install. Those changes were too extensive to list here, but I would like to point out a few you may find useful, particularly if you come from the Linux/Unix world.
Function key handling on PowerBooks with Mac OS X has always been a problem. The system has assumed you want to use the function keys for controlling your Mac first and controlling your applications second. This means that pressing, for example, F3 mutes your audio output. If you wanted to press F3 in Emacs to close a window, you had to use Fn-F3. This causes no end of annoyance for users accustomed to using function keys as application keys first and system control buttons second.
Apple has finally offered a fix for this in Mac OS X: in the Keyboard and Mouse System Preference panel, you can now select use F1-F12 keys to control software features to allow applications direct access to the function keys.
Next, I turned off the dashboard. I wanted to like it, I really did. The widgets certainly look cool. However, I was constantly activating the Dashboard when I pressed the eject key (F12). Secondly, my Powerbook is slow and old and it didn't seem wise to waste processing power on something I wasn't going to use. I followed these directions to permanently shut off the Dashboard.
Another very handy and often overlooked improvement to keyboard use on the Mac is to enable Full Keyboard Access in the Keyboard and Mouse System Preferences panel. This allows you to tab between all form elements and not just text boxes. This means, for example, that with a Yes/No/Cancel type of application window, you can tab to the Cancel button and press enter instead of reaching for the mouse.
I would also like to point out the virtues of using the screen corners to activate Expose. Expose is probably my favorite piece of useful Mac eye candy: at the press of a button, you can make all application windows slide off the screen or rearrange so that you can see all onscreen windows at once in miniature with no overlapping. Expose is one of those features that's hard to explain but amazing when you see it.
By default, show all windows is bound to F10 and show the desktop to F11. I don't like to use these keys because I find the placement and size of the Powerbook function keys in the upper right of the keyboard very awkward. The function keys are also much smaller than the other keys on the keyboard so they are even harder to use.
Instead of simply using the function keys to control Expose, I like to trigger these functions by sliding the mouse into the corners of the screen. I use the lower-left corner for All Windows and the upper-right corner for Desktop. To enable this, go to the Desktop and Screen Saver system and preference panel and select Hot Corners. You can also experiment with using this to enable the screen saver or Dashboard.
Note that if you are a touch typist like I am, this trick only works well on a laptop, when you have the scroll pad right under the keyboard. Otherwise, you have to move your hand off the keyboard and grab the mouse all the time.
Startup Items
Of course a large part of customizing a system is the selection of startup items. While you can manually start your applications every time you power on your Mac, invariably you will forget something and then have to wait around while it loads. I added the following to my startup items (under the Accounts System Pref panel):
- Meteorologist: Meteorologist is a simple and efficient weather utility for your menu bar. By default, it displays the current weather (with an icon) and the temperature. Click on the icon to see forecasts. Remember, I disabled Dashboard, so I don't use the Dashboard weather widget. Free and GPL licensed.
- Terminal.app (comes with the OS): I interact almost constantly with the Terminal so it makes sense to start it automatically. There are other Mac terminal programs out there such as iTerm, or you could always use xterm. However, the Mac Terminal.app has everything I need and is well integrated with the rest of the OS.
- Slim Battery Monitor: Once you start adding items to the menu bar, it gets full pretty quickly. This free application helps by using less space and generally looking nicer than the default battery application. Not a necessary tool, but I like it. Freeware.
- Desktop Manager and Aquamacs: I discussed these applications previously so I won't say much here other than that if you use them, then you want to load them on startup so they are ready to go right away.
- SSHKeychain: The Mac OS Keychain enables a centralized password mechanism. When you unlock Keychain (which happens by default when you log on), you gain access to all stored passwords, such as website logins.SSHKeychain extends this to SSH keys so it is a Mac GUI equivalent of using
ssh-agentandssh-addto store key passphrases in memory on other platforms. Note that you are free to use those tools if you choose. SSHKeychain simply integrates ssh key management more closely with the Mac OS so it is more convenient. Plus, of course it has a pretty GUI like all good mac apps. Open source. Synergy: This is one of the few shareware Mac apps I've actually paid for (either because I'm so cheap or Synergy is insanely great). Synergy adds a few iTunes enhancements that I find indispensable:
- Current song floater: a small transparent window that displays the current song info and the album cover (which Synergy downloads from the web automatically). This pops up on each song change and is very useful if you happen to use Desktop Manager and/or keep iTunes minimized all the time.
- Keyboard shortcuts for player controls: system-wide customizable shortcuts for essential iTunes functions such as Play/Pause and Skip to Next Track. This way, you don't have to track down the iTunes window every time you want to pause the music.
- MenuMeters: MenuMeters provides exactly what the name implies - meters in your menu bar. You can customize it to display various system statistics such as CPU load and network activity. This gives you immediate feedback when a Firefox plugin decides to try and take down your system by consuming all available CPU. Open source.
My Menu Bar
All of these customizations result in a pretty crowded menu bar. Remember that every program shares the same menu bar on the top of the screen; the menus on the left side are application-specific, while the right side is where systemwide applications display their information.
Here's what my menu bar looks like, with some explanations:
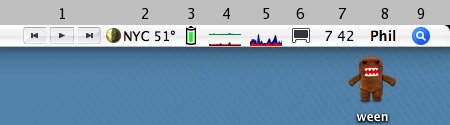
- First, the Synergy controls for iTunes. These aren't strictly necessary because I can always use the Synergy keyboard shortcuts. However, it's sometimes convenient to use the mouse instead.
- Next is the weather display for Meteorologist, including an image for the current conditions, the city, and the temperature. I know there is a dashboard widget that provides similar information, but I like the fact that Meteorologist is always right in my menu bar.
- As you can see, the menu bar can get crowded pretty quickly, which makes Slim Battery Monitor more important. As the name implies, it's slimmer than the default battery icon, and it's in color! What more could you want?
- (and 5) These are the MenuMeter displays. #4 is network traffic (bytes in on top, bytes out on the bottom). #5 is CPU utilization, with system in red and user in blue.
- The CPU utilization graph is particularly useful because of the instant feedback. If the CPU graph is pegged at the top of the menu bar, it's time to investigate what is loading down my system (of course, the answer is usually a Firefox plugin).
- I connect my PowerBook to my TV on a regular basis to watch DVDs. Thus it's useful to have Detect Displays at the ready on the menu bar.
- The time, obviously. Because I'm well organized and punctual.
- I use fast user switching to share my Powerbook with my wife. Click on my name to switch to a different user.
Last of all is Spotlight. Spotlight is absolutely fantastic - I would say it's the most important new feature in Tiger. The power of Spotlight is that it always has an up-to-date index of everything on your hard drive, and it knows how to extract text from things such as PDF files.You can invoke Spotlight at any time by pressing
cmd-spaceand from there, open any application or file with just a few keystrokes. That makes it the quickest way to:- find a mail message (full mail message text is indexed via Mail.app)
- open a system preference panel
- find a PDF containing (for example) the string "MAKE MONEY FAST"
Final Thoughts
I was apprehensive when I first started using a PowerBook as my primary home system almost two years ago. Could I, a longtime Linux user, really find satisfaction with a Mac? As you have probably already figured out from this article, the answer is yes. The Mac OS is an incredibly powerful environment and it manages to look good at the same time.
I also found it relatively easy to upgrade the hard drive in my PowerBook. The closed nature of the Mac hardware means there are fewer things that can be misconfigured and fewer hardware issues to worry about. In addition, the simple mechanism used to install most Mac software (drag and drop one file) makes installing and upgrading software a snap. Features such as these make me look forward to many more years of running a Mac as my primary desktop system.
Philip Hollenback is a system administrator at a financial firm in Manhattan. When he's not upgrading Linux servers or skateboarding, Phil spends his time updating his web site, www.hollenback.net.

